Stretching is a natural reaction to encountering tension in the body—but did you know that in most cases tightness is a mask for weakness?
Tight hips. It’s an all-too-common grievance as people bemoan the symptoms of a modern lifestyle that has us sitting for hours on end, at work and at home. We often try to stretch-out, “free” or open-up our hips in our yoga practice, but equating tightness with the need to stretch is not always the right solution.
Tightness is often a mask for weakness, but we usually flip this logic on its head and think we need to stretch to relieve tension. However, the more stable and strong your hips, the more flexible they are, and when we stretch out our hips too much, we risk taking away the support needed to move safely and efficiently.
We need an incredible amount of support for our hips in order to walk, run, jump, squat and even sit. A lack of proper support in the hip joint can contribute not only to tension but also to hip weakness and misalignments. Over time, misalignments lead to all kinds of hip and back problems and can become a contributing factor to osteoarthritis, increasing our chances of needing a hip replacement later in life.
So, the next time you feel compelled to “open up” that tight hip, you might want to reassess your approach.
How do you know if you should stretch or strengthen your hips?
One rule of thumb is, if you have been stretching out an area of your hip for a few months and it doesn’t feel any different, it is actually begging for support—asking you to make this areas stronger, not more open. For example, if you are regularly practicing Kapotasana (pigeon pose) and your hip sensation is not changing, this could very well be an indication not to push harder and go deeper in the stretch, but to actually strengthen your hips!
How do you properly strengthen your hips?
Building strong, healthy hips that have ample support and stability means evenly working all three areas or compartments of the hip joint: the back/outside, front and inside. If you do a lot of repetitive movements or particular exercises, make sure you assess what your doing and ask yourself: “Is my routine balancing the support in all compartments around the hip?”
When we focus on balancing strength and power in all three areas of the hip, we end up with increased function, more comfort and a renewed ease of movement. The stronger your hips are, the more flexible they are, allowing you to move safely in your daily life and your yoga practice for decades to come!
Here are six exercises you can add to your home exercise practice or any workout regimen to make sure that you are conditioning your hips in a way that supports them in their optimal range of motion:
Standing Hip Hinge
Stand with feet hip distance apart and hands on hips. Pull up tall in your torso, without feeling strain, and hinge forward at your hips. Lean forward to about 70º and then return. This exercise works the back of the body and particularly the back of the thighs, buttocks and lower back. These muscle groups work together on the way down and up from the hinge.
Do 6-10 reps.
Caution: If you feel strain or compression in your lower back try tightening your midriff as if wearing a corset. Or, reduce your range of motion.
Standing Hip Hinge with Crossed Arms
Stand with feet hip distance apart and hands folded in front of your chest. Pull up tall in your torso without feeling strain, and hinge forward at your hips. Lean forward to about 70º. Press your arms forward and up toward your face gradually. Then return to tall standing. This exercise works the back of the body just like the Hip Hinge. Adding the arm motion puts more demand on the muscles of your lower back, so it is common to feel more engagement there.
Do 6-10 reps.
Caution: If you feel strain or compression in your lower back try tightening your midriff as if wearing a corset. Or, reduce your range of motion. Or, omit the arm motion.
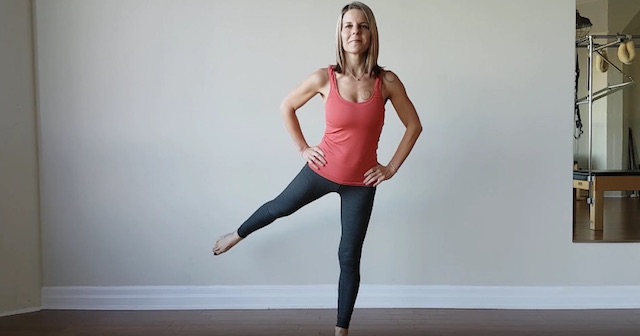
Standing Side Lean with Leg Lift
Stand with feet hip distance apart and hands on hips. Shift weight onto left foot. Simultaneously, lean torso left and gradually reach right leg out to the side and up. The height of the leg lift can vary. The key is continuous movement and engagement along the outsides of both hips and both sides of the torso.
Do 3-4 reps on each side.
Caution: Make sure to keep your body and legs aligned sideways. Avoid sticking your buttocks out behind you or your ribs forward. These are balance strategies but compromise how you execute the exercise.
Skate Squat
Stand with feet hip distance apart and hands on hips. Bend into a mini squat and as you return to tall standing, shift weight onto one foot while reaching the other leg to the side-back, just like skating. Alternate side to side and avoid using momentum. This exercise is dynamic and uses tons of muscles in the lower limbs. As you squat feel for buttocks and front thigh muscles. In the skate, feel for buttocks of the lifted leg.
Do 6-10 reps (alternate sides).
Caution: Make sure knees are aligned in parallel for the squat. Make sure lower back does not compress with the leg reach to the side-back.
Knee Raise
Stand with feet hip distance apart and arms hanging at sides of torso. Shift weight onto left foot, tighten midriff and gradually raise right knee above hip height. Hold for up to 15 seconds. Then, lower the leg and switch sides. This exercise works a deep hip stabilizer you cannot feel. So, when this exercise feels easy to do, you’ve mastered it!
Do 3 reps each side.
Caution: If your hip crease cramps or it is impossible to raise your leg above hip height, go only as far as you can.
Lunge with rotation
Stand in a lunge position, left leg forward, right leg back and arms out to a “T” position. Point both feet forward and lift back heel slightly off floor. Gradually rotate torso toward forward leg while leaning forward slightly. The idea is to rotate to the point where it looks like the back leg and torso form one long diagonal line. Feel for buttock muscles (especially on the forward leg side) and a winding/unwinding in the spine.
Do 4-6 reps each side.
Caution: Make sure forward knee aligns over the ankle throughout the exercise. This helps keep it stable and comfortable.
Author: Margot McKinnon
Image: YouTube Still
Editor: Emily Bartran

 Share on bsky


Read 21 comments and reply