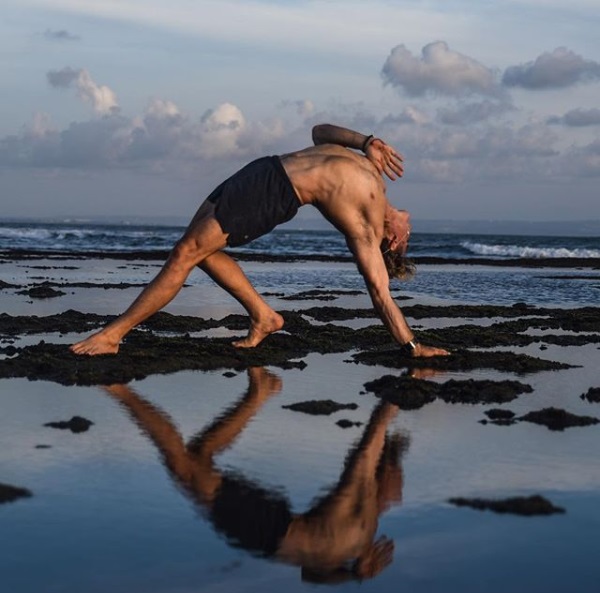
Ayurveda—India’s ancient wisdom science of longevity—categorizes us as unique individuals, each stepping into life with our own physical, emotional, mental, and spiritual blueprint.
This blueprint, or prakriti in Sanskrit, arises from Ayurveda’s universal life-creating elements: earth, water, fire, air, and space. These elements combine to form specific bio-energies called doshas, existing within us as well as in the world at large. Earth and water create the heavy Kapha dosha, from fire and water emerges fiery Pitta, and from air and space we get light and excitable Vata.
It is our unique ratio of Vata, Pitta, and Kapha that gives us recognizable characteristics, traits, and quirks. For example, earthy Kapha people have bigger bones and tend toward calm solidity, athletic Pitta people exhibit competitiveness and passion, while Vata people tend toward thinner frames, as well as a quick, creative, scattered mind.
Our work in life, according to Ayurveda, is to understand our doshic blueprint so that we can choose activities, food, and a lifestyle that balance, rather than amplify, our doshas.
Understanding our doshas is also key to getting the most benefits from our yoga practice. If you’ve ever been to a yoga class and emerged feeling a little out of it—you may have felt irritable and over-heated; or perhaps too scattered and spacey, or too mellow and melancholy—it is possible that your yoga practice is not supporting your doshas.
Here is a short guide to poses that will help to balance your doshas for maximum health and happiness.
Pitta:
What Pitta wants: Pitta people are attracted to intense and goal-oriented physical yoga practices such as Ashtanga, power yoga, and Bikram or hot yoga.
Watch out for: Excess heat and drive, which may cause burn out.
What Pitta needs: Pitta’s athleticism is great for releasing excess energy, but they must balance their goal-oriented focus with some more chill. Our prescription is to practice yoga poses with a calmer, more relaxed and fun attitude. Choose flow or vinyasa yoga classes in normal temperatures and outside in nature. Stay away from heated yoga. Pittas need to enjoy the journey, not just the destination. In Blissology Yoga, we say, “the grin on your chin is more important than your chin on your shin.”
Key poses for Pitta:
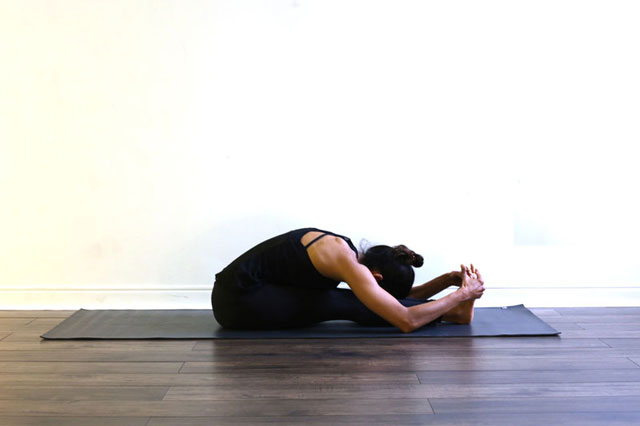
Pitta pose 1: Paschimottanasana (Seated Forward Bend)
This calming pose helps develop inward focus and surrender with the downward gaze and rootedness of the pose.
How to:
1. Start in seated pose with the legs slightly bent. Hold the feet if you are more open or calf muscles if you are a little tighter.
2. On inhalation, lengthen the spine, generating an upward lift using the heels, sit-bones, and diaphragm.
3. As you exhale, straighten through the legs and tilt the pelvis forward. Breathe into the stretch slowly, feeling tightness leave the entire backside and calmness permeate your mind. Relax the forehead and jaw to reduce your driven tendency to push into a posture.
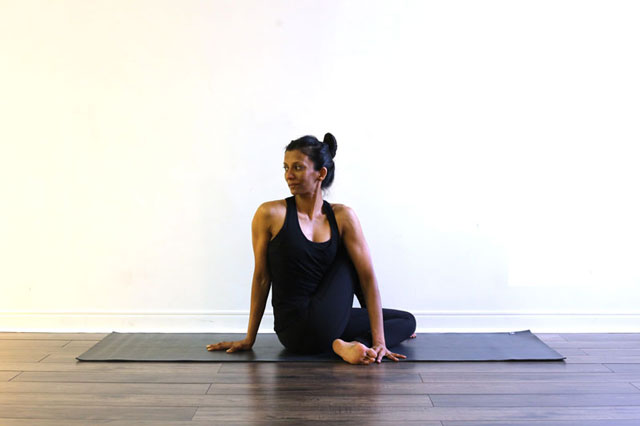
Pitta pose 2: Ardha Matsyendrasana (Half Spinal Twist Pose)
This deep twist moves excess heat away from the belly, releasing too much anger, frustration, or willfulness.
How to:
1. Start with the bottom knee bent so that the left heel is by the right hip.
2. Cross the right leg over top and cradle the right shin making it an anchor point.
3. Breathe in and lengthen the spine and as you breathe out, pull the right hip back and press it down to open the outer hip muscles.
4. On the next inhalation, use the diaphragm to lengthen the spine and on exhalation, twist to the right lengthening right shoulder from the top right knee.
5. Focus on breathing out anything you need to release.
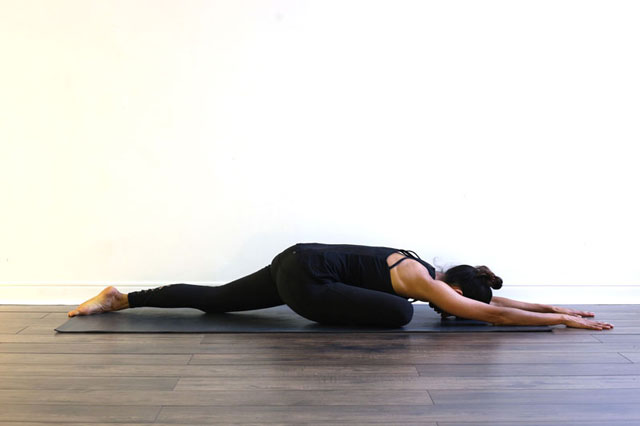
Pitta pose 3: Kapotasana (Pigeon Pose)
This pose specifically targets the “tight-ass-ness” that tends to come from Pitta people holding their hips tightly due to the high discipline and Type A mindset. It is probably the most challenging yet soothing medicine to calm the fire of too much Pitta.
How to:
1. From Downward Dog, step the right foot forward between the hands. Drop the back, left knee down.
2. Slowly walk the right foot to the left, drawing the heel in closer to the body if you are a little tighter and moving it forward if you are more open.
3. It may not be your custom, but use the hands to press the sit-bones backward, as you start to bring the spine toward the floor. The head lengthens forward and the pelvis presses backwards. Don’t rush the hips to the floor—it is more important to have the bones of the knee supported.
4. Breathe into the right hip. On exhalation let go of tension and feelings of excessive striving around the hips. We recommend breathing in deep through the nose and releasing stuck emotions through an open mouth.
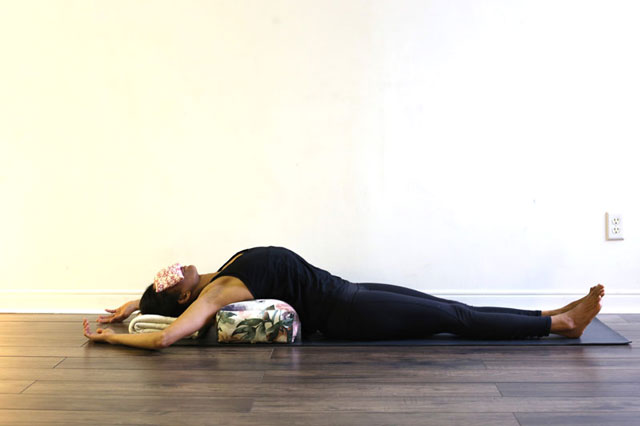
Pitta pose 4: Supported shoulder and chest stretch
This pose soothes the Pitta fire as it is grounding and removes the effects of stress in the body, especially in the chest and shoulder area.
How to:
1. Place the bolster across the width of the back (left and right) not the length (up and down) as in the accompanying photo. The placement of the bolster (if you don’t have bolster, use a rolled up yoga mat instead) should go on in the lower part of the thoracic spine at the level of the lower border of the shoulder blades. Our goal is to tilt the upper rib cage backward.
2. This pose won’t feel good if the neck is hinging sharply so place a blanket under the back of the neck to take the stress off of the neck.
3. Once the blanket and bolster or mat is in place, reach the arms overhead and tune into the breath. Every time you breathe out, let tension go. Our Blissology Mantra is: less thinking, more sinking. The result is total bliss.
~
Vata
What Vata wants: Vata loves variety and those with high Vata love trying various styles of yoga classes. They are attracted in particular to fast, flowing movements as well practices such as Kundalini, which offer spiritual highs.
Watch out for: Practices that can impair Vata’s often hypermobile joints; and a sense of un-groundedness after taking in too many classes that get your Kundalini rising too quickly.
What Vata needs: Consistency in practice. Committing to your yoga mat at the same time daily is essential to offer Vata the routine it needs to calm down. Vata people run cold, so practicing in a slightly warm room is wonderful. Our prescription is to practice strong, grounding, and balancing poses using a calm, deep breath, focused eye gaze, and long holds to help soothe and nourish Vata. This will also help to regulate the irregularity that Vata types often experience with digestion and elimination.
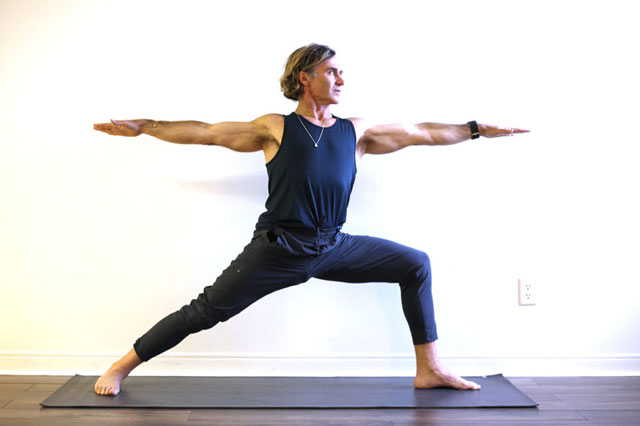
Vata pose 1: Virabhadrasana II (Warrior 2)
This dynamic standing pose requires grounding through the feet and a focused gaze (drishti) over the middle finger.
How to:
1. Start at the top of your mat in standing pose. Take your left foot back so that the heels are about four feet apart. Point the front foot forward and the back foot at roughly 45 degrees.
2. Keep the back full and the pelvis upright (don’t let it tilt forward too much) and slowly bend the front standing leg. Keep pressing the front knee outwards so you feel the stretch in the inner front adductor.
3. Gaze toward the front hand and breathe calmly for 45 seconds before repeating on the other side.
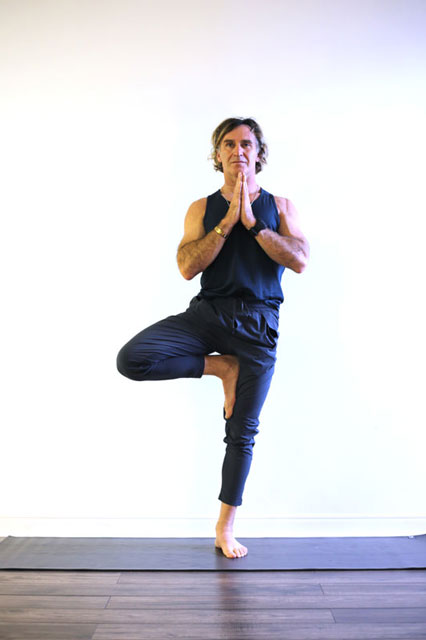
Vata pose 2: Vriksasana (Tree Pose)
The focus required in balancing poses is ideal for Vata’s need to pay attention to the present moment. This balance will extend into our lives and curb our scattered focus.
How to:
1. From standing position, lift the right leg and place the foot as high up the inner left thigh as possible. Press the foot into the inner thigh (not the knee).
2. Connect the lower rib cage to the upper pelvis and keep the back long.
3. Bring the hands into prayer and focus on an immovable object in front of you. This fixed gaze is key to counter the wandering mind of Vata.
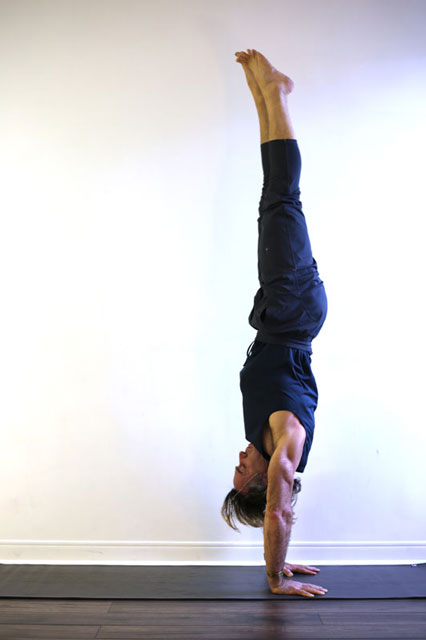
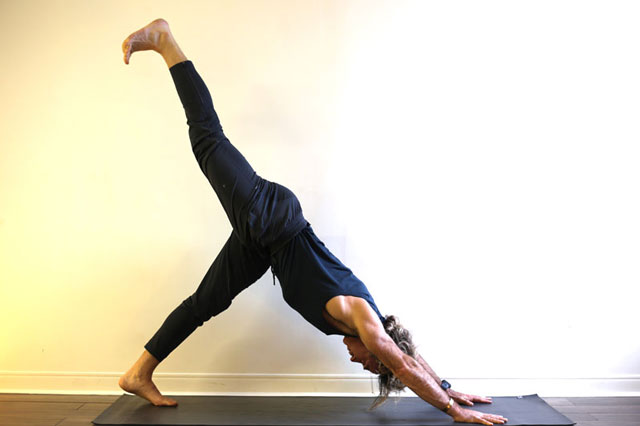
Vata pose 3: Handstand (with option of One Leg Downward Dog)
Handstands are excellent for Vata because, almost more than any other pose in yoga, they require total focus. The mind cannot be scattered or the pose will not happen. If the mind is too full of anxiety or fear, simply practice the intermediary pose—one-legged downward dog.
How to:
1. Start in downward dog. Activate the arches of hands, and integrate the arms into the torso using the muscles of the upper arms and torso.
2. Connect the lower ribs to the pelvis using the abdominal muscles.
3. Lift up one leg in downward dog, pressing out through the heel.
4. Bend the bottom leg and spring up to vertical. The goal is to not let the body distort.
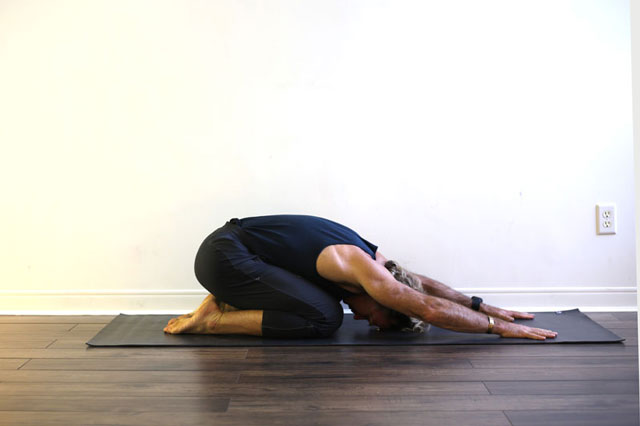
Vata pose 4: Balasana (Child’s Pose)
The stillness and deep connection with the earth beneath, makes this pose incredible medicine for all imbalances Vata dosha can cause to our minds and bodies.
How to:
1. Start on all fours and slowly drop your hips back onto the heels.
2. Let the knees separate and the belly soften. If this creates too much pressure on sore knees, keep the thighs perpendicular to the floor.
3. Ideally, the forehead relaxes onto the floor and softens. If this isn’t possible, prop your head up on your hands to elevate the skull or, even better, use a bolster or a pillow. The idea of the breathing pattern is to let the body sink more with every exhalation and to bring more life energy in on inhalation.
4. Stay for a few minutes to let the relaxation arise and the inner sense of calm permeate.
~
Kapha
What Kapha wants: If you look around at the folks in your restorative yoga class, chances are, many of them will be Kapha. Kapha folks love mellow, relaxed yoga classes, with more comfort and less intensity.
Watch out for: Physical and mental slowness, rigidity, and a love of too much ease.
What Kapha needs: Of the three types, Kapha can sustain a stronger physical yoga practice. They need to push themselves out of their comfort zone, try new offerings and up the intensity of their practice. In other words, they need a little more fire and creativity in life on and off the yoga mat.
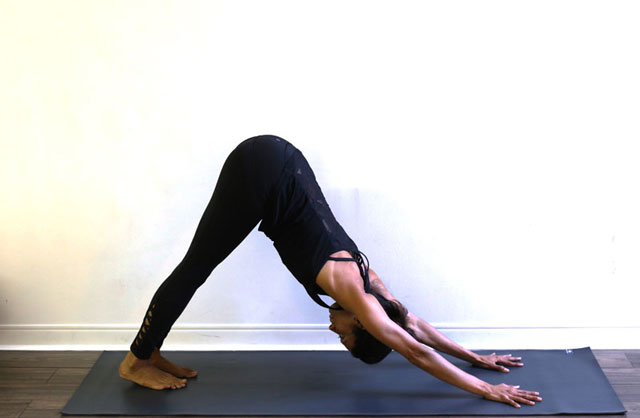
Kapha pose 1: Adho Mukha Svanasana (Downward Dog)
This pose is great for Kapha because it builds heat and energy flow, and overcomes inertia.
How to:
1. Start on all fours, placing hands an inch or two in front of the shoulders.
2. Bend the knees and lift the sit bones upward toward the sky.
3. Integrate the ribcage and pelvis together and broaden the back.
4. Keeping the spine long and the sit-bones lifted, slowly bring the heels down toward the floor.
5. If you are a little tighter, the heels don’t have to touch the floor but what is important is the backward press of the pelvis and the traction of the spine. Use the breath to create this spinal length.
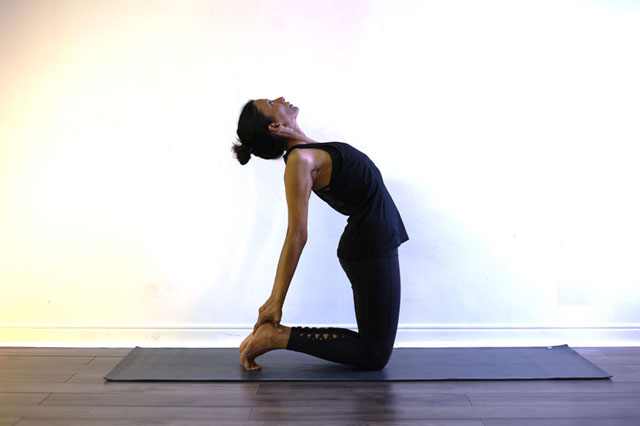
Kapha pose 2: Ustrasana (Camel Pose)
Energizing and enlivening, this pose adds much-needed fire to the heavy earth element of Kapha.
How to:
1. Start on the knees with the toe mounds tucked under. Starting the pose from active feet, gather the inner legs together to create a feeling of lift rather than just sinking toward the floor.
2. Lift the pubic bone upward toward the sky using the lower abdominal chain.
3. Keep the upper sternal body elongating away from active feet so that the lower back stays long and doesn’t compress.
4. If it is easy, hold the heels, but if it feels like they are too far away, simply keep the hands on the hips.
5. Breathe fully in through the nose and release tightness through an open mouth.
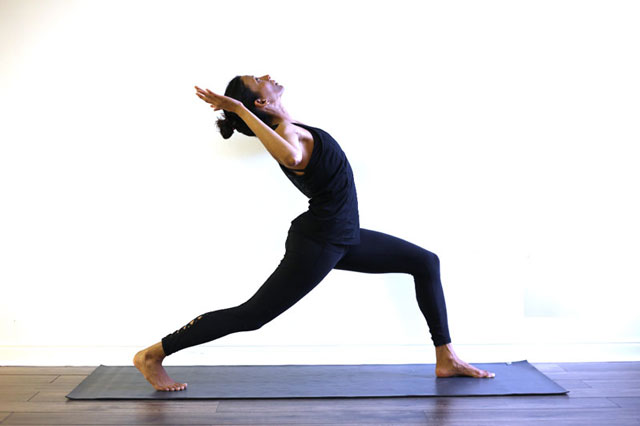
Kapha pose 3: Anjaneyasana (high lunge variation)
This dynamic pose is great for Kapha imbalances because it combines the enlivening energetics of a backbend with the fire of standing poses.
How to:
1. Start in a deep lunge with the right foot forward.
2. Activating the back, left foot, lift the pubic bone upward toward the sky to lengthen the psoas and provide a healthy foundation for bending backward.
3. Stay elongated through the upper body using the diaphragm and abdominals to minimize compression in the lower back.
4. “Cactus” the arms. Arch the head back only to a degree that is comfortable and breathe here for 45 seconds before changing sides.
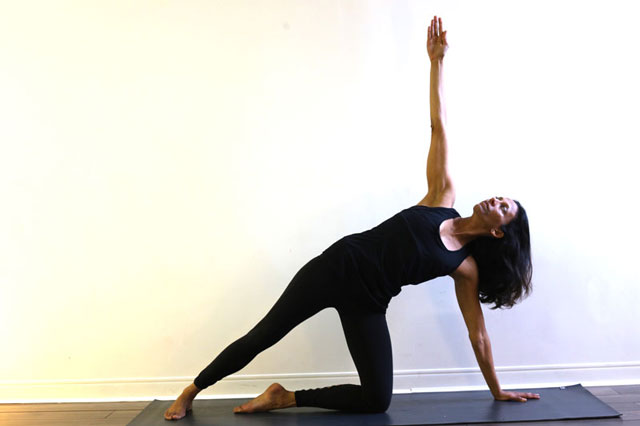
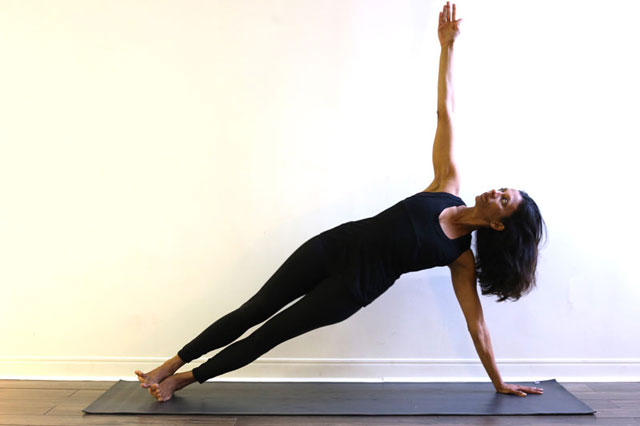
Kapha pose 4: Vasisthasana (Side Plank Variation)
This pose creates muscle tone and will help to improve mental drive and discipline.
How to:
1. Start with the left hand under the left shoulder and the left knee on the floor.
2. Turn to the big toe side of the right foot, pressing the heels away. Lift the top right hand toward the sky. This is the preliminary place to work in the pose and a great variation to build strength.
3. Over time, you will be able to stack both feet removing the weight from the left knee.
4. It will be important for both the full and half variation of side plank to use the inner and other leg muscles, the obliques as well as the muscles of the arms, hands, and shoulders to create lift.
All photo credits are to Blissology™
Studio Location: Half Moon Yoga, Vancouver
Props: Half Moon Yoga props
~
~
Author: Eoin Finn & Insiya Rasiwala-Finn
Image: Blissology™; @blissology/Instagram
Editor: Nicole Cameron
Copy Editor: Catherine Monkman
Social Editor: Lindsey Block


 Share on bsky


Read 1 comment and reply